
Clinical guide · Prep and scan · Free PDF
Digital Dental Prep and Scan Workflow
From crown preparation to a great digital impression.
A free, printable 12-step guide that takes your team from crown preparation to a great digital impression. It covers prep design, adjacent contacts, retraction and CDC, intraoral scanning and the bite, and a final scan check before the case goes to the lab, with a chairside checklist on the last page.
The key idea. Design and engineering win out over chemistry. A well-designed preparation will outlast a poorly designed one that depends on adhesion from cement.
Phase 1
Design the preparation
Start with a well-designed prep.
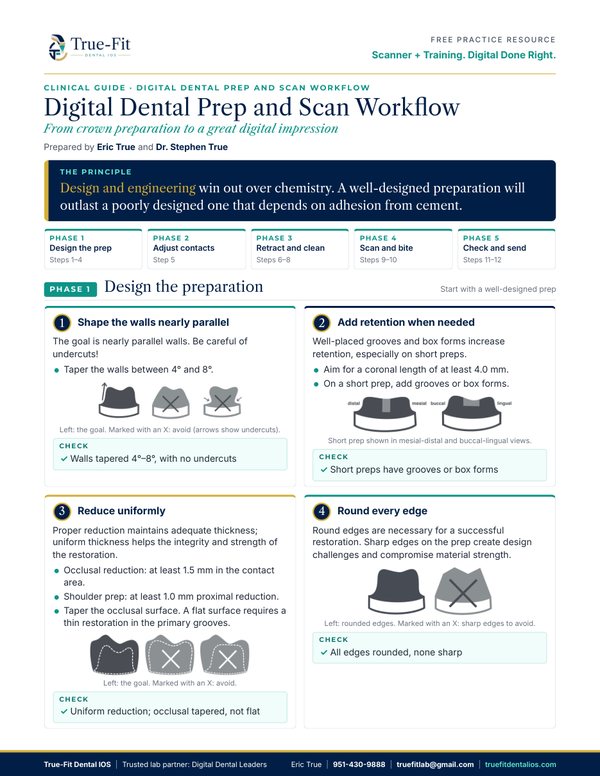
Step 1: Shape the walls nearly parallel
The goal is nearly parallel walls. Be careful of undercuts.
- Taper the walls between 4° and 8°.
Check: Walls tapered 4°–8°, with no undercuts
Step 2: Add retention when needed
Well-placed grooves and box forms increase retention, especially on short preps.
- Aim for a coronal length of at least 4.0 mm.
- On a short prep, add grooves or box forms.
Check: Short preps have grooves or box forms
Step 3: Reduce uniformly
Proper reduction maintains adequate thickness; uniform thickness helps the integrity and strength of the restoration.
- Occlusal reduction: at least 1.5 mm in the contact area.
- Shoulder prep: at least 1.0 mm proximal reduction.
- Taper the occlusal surface. A flat surface requires a thin restoration in the primary grooves.
Check: Uniform reduction; occlusal tapered, not flat
Step 4: Round every edge
Round edges are necessary for a successful restoration. Sharp edges on the prep create design challenges and compromise material strength.
Check: All edges rounded, none sharp
Phase 2
Adjust the adjacent contacts
Before tissue management.
Step 5: Evaluate and adjust the adjacent contacts
- Make contacts parallel with the prep and with each other, for draw and breadth.
- Make contacts broad, for ideal restorations.
Check: Contacts parallel with the prep and each other, and broad
Phase 3
Retract, clean and dry
Get the margin ready for the scanner. Tissue and tooth structure look the same to a scanner, so a great scan starts before the scanner ever reaches the tooth.
Step 6: Manage the tissue: double pack the cord
Double pack the cord, then remove the top cord just before scanning.
Check: Margin is clear of tissue all the way around
Step 7: Make the prep CDC and clean the margins
Clean the margins with a micro brush. CDC means:
- Clean: no debris.
- Dry, dry, dry: no moisture.
- Clean margins.
Step 8: Beware of double margins
Double-check the margin before scanning. A double margin confuses the margin line on the scan.
Check: One clean, continuous margin; no double margins
Phase 4
Scan the prep, bite and opposing arch
Intraoral scanning technique for an accurate digital impression.
Step 9: Scan with the recommended pattern
Use your scanner manufacturer's recommended scan pattern for the most accurate scan and best results. For practices with a scanner placed by True-Fit Dental IOS, Eric walks the team through the scan workflow during in-office training.
Step 10: Capture the opposing arch and the bite
Capture the contact and occlusal surfaces that will touch the restoration.
- Scan the opposing arch, then take a full bite scan, finishing the scan pattern rather than stopping early.
- If the patient's bite is unusual, take a photo for the lab.
Check: Bite verified after the case renders
Phase 5
Check the scan and send it to the lab
Review before you send.
Step 11: Evaluate the scan for margin clarity
Before you send the case, look closely at the scan and confirm the margins are clearly captured, the contacts are complete, and the bite is correct.
Step 12: Send the case to the lab
- Send good upper, lower and bite scans, plus a preop or provisional scan if needed.
- Complete the Rx, with any notes on scheduling, design or due date.
- Not sure about a margin or the bite? Call Eric before you send.
Check: Upper, lower and bite scans attached; Rx complete
Run it top to bottom before you send
Chairside checklist
Prep design
- Walls nearly parallel, tapered 4°–8°, no undercuts
- Grooves or box forms on short preps
- Uniform reduction; occlusal surface tapered, not flat
- All edges rounded, none sharp
Contacts and tissue
- Contacts parallel and broad
- Cord double packed; top cord removed
- Prep is CDC: clean, dry, clean margins
- No double margins
Scan and send
- Recommended scan pattern used
- Opposing arch and full bite captured
- Scan reviewed for margin clarity
- Upper, lower and bite scans sent with the Rx
Questions about a prep or a case? Eric is glad to talk it through. Text Eric at his cell, request a call back or email him; he replies quickly.
General guidance from Eric True's laboratory experience and Dr. Stephen True's clinical experience. It does not replace your clinical judgment or the instructions of your scanner and materials manufacturers.